Monday 25 June 2012
Short Sleeved Shirt from a Long Sleeved Shirt Tutorial
My eldest often has long sleeved school shirts that are either too small or the cuffs are damaged. Instead of throwing these away or donating to charity I will cut the sleeves to make the shirts wearable for the summer months. This could be done for any shirts or long sleeved tops, I do this with my children's clothes when the cuffs are damaged. This is especially good for the girls as I can make a 3/4 length sleeve which is quite fashionable!
4 Quick Easy Steps:
Step 1) To judge where to cut the sleeves is to lay a short sleeved top over the long sleeved one and add a little extra for hems and cut along.
Step 2) Unpick the stitches near the cut (a couple of centimetres) this makes it tidy later once you have sewn the hem.
Step 3) Fold and iron a hem along the sleeve and stitch all the way across the hem.
Step 4) Stitch from the top of the sleeve down securing the stitches where you had unpicked earlier.
Parties linked to this week are:
Monday 18 June 2012
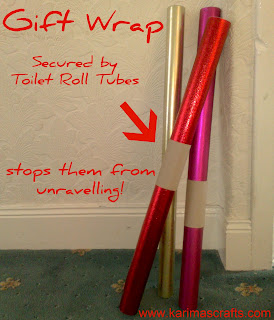
Great Ideas - Toilet Roll Tubes as Gift Wrap Holders
I saw this idea on Pinterest a while back and thought what an easy and simple idea! I now do this for my rolls of wrapping paper (as my photo shows!). I have thrown away many pieces of damaged gift wrap in the past because it has unravelled and damaged the paper.
Pinterest is a great site that I get a lot of inspiration from. If you are not already a member I would suggest popping by and see what great stuff people like pinning. I have a board just for 'great ideas' and I love finding new great ideas from other people! You can follow my Pinterest boards by clicking on the Pinterest Logo on the right hand side of my blog.
PS: I am not being asked to do a review, I simply love Pinterest and want to share this site with you!
Parties linked to this week are:
Monday Gratitude
Today for the first time I joining in with the lovely Marie from heartintransit she does a weekly Monday Gratitude Post. I love her blog she is a creative writer and writes in both English and French!
So here goes, the things I am grateful for this week are:
Why not join Maire at her blog: heartintransit

So here goes, the things I am grateful for this week are:
- My kids were all at school last week - No illnesses and having to look after poorly children!
- Having the time to make some lovely fabric boxes to put on my new shelves - and it cost me nothing!
- Meeting some new friends at an Islamic Class I have just joined.
- Having the time to read my fellow bloggers posts this past week.
- Having some family time last week - I took the children to the Funfair and they really enjoyed themselves.
- I learnt another Surah this past week - with help from my 13 year old son.
Why not join Maire at her blog: heartintransit

Monday 11 June 2012
Hijab Pins or Brooches Display Board Tutorial
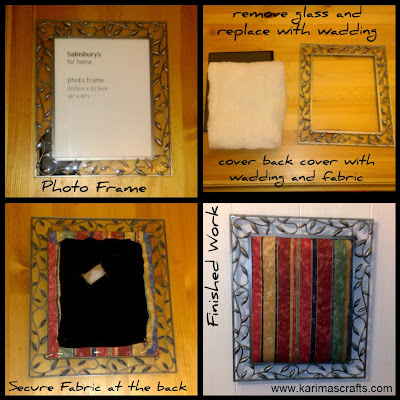
I made a display to hold all my favourite hijab pins and brooches. I actually hang this on the wall next to my hijab scarves but you could also place this onto a dresser.
I did actually see one similar I think on an Etsy shop and thought what a brilliant idea! So I had to make my own version of one with a frame I already had in the house. These really are so easy to make and you can design it any colour you wish. I liked the colour of this frame but you could spray your own frame a different colour if you wish. I also chose a frame with detail on the edges as this helps hold some of the other hair accessories that I have. This project cost me nothing as I already had all the materials I needed in the house! I have gave a quick tutorial below of how I made this.
Materials Needed
- Photo Frame
- Padding (wadding or foam)
- Fabric
- Staple gun/glue or tape
Step 2) Place padding over the frame back
Step 3) Place fabric over the wadding and secure to the back of the frame back (staples/glue or tape).
Step 4) Place the completed back into the frame and secure with the frame tabs.
Step 5) Display your finished Pin Organiser!
See it really is so easy to make - you can do this so quickly too!
Parties linked to this week are:
Monday 4 June 2012
Upcycle - Stuffed Soft Toy Door Stopper Tutorial
The photograph above shows a stuffed soft toy that belonged to one of my children. If you want a unique door stopper then why not make one out of an old soft toy! All you need to do is take out some of the stuffing and replace with rice or pebbles.
When doing this I would suggest possibly making a secure small bag of rice and place this inside the soft toy so there is less chance of the rice slipping out of the seams. This is very easy and a great way to use any unwanted soft toys - You could even use this as a Book Stopper on a bookshelf to keep the children's books in place!
4 Easy Steps:
1) Unpick at the seam (preferably somewhere not seen - bottom)
2) Remove some stuffing if required!
3) Add some pebbles or rice into the hole at the seam
4) Sew up the hole and you now have a door stopper!
Non-post related time to have a moan
I am linking this post to a few parties which I will place a link to at the bottom of this post. I have in the past linked my posts to many linky parties but for some reason lately I have not been getting any traffic or comments back from these parties or the blogs I visit personally during these parties. I have therefore only picked a handful of blogs that I will now link to - these being where the blog owners actually pop by and kindly leave a comment thanking me for joining the party. I am not sure if the reason people are no longer commenting is only linked to my blog or if it is a trend now that people don't return the favour. I don't see why I should spend a lot of my personal time popping by over 30 blogs every week linked to the parties I attend and leave comments when they don't come by my page and return the comments. I did think about stop linking altogether but I will keep it with the handful for now and see how things go. If any party owners are reading this maybe they can answer me why my comments have dwindled?
For my normal followers who don't understand the 'party' I am mentioning above - this is just a way for fellow bloggers to share their crafts and mix with other like minded crafty people and share comments and give each other traffic to their blogs. I already have a list of non crafty misc. blogs (I have the list on my page) that I visit every week - many of these bloggers also come by and leave me comments too - which I would like to say at this time -BIG THANK YOU'S to you all.
Sorry if this post has a bit of a moan theme - that is not normally me as my main followers will know! Its just that the extra hours I put into these parties every week don't seem to be doing anything for me or my blog and I just wanted to vent my frustration about that! I did actually cut down this last month to only joining the parties fortnightly so that I wasn't having to spend as much of my personal time visiting the blogs each week - but I had to make the decision to cut right back and use my time for more beneficial uses.
Parties linked to this week are:
Subscribe to:
Posts (Atom)


