Pages

Sunday 30 June 2013

30 Days of Ramadan Crafts - Starts Monday 1st July 2013


This year I decided to do a blog project for Ramadan and came up with the idea of a craft for each day of Ramadan. This has been a huge task and has kept my children busy for the last few weeks preparing all the crafts! We have all had so much fun doing all these crafts and I can't wait to start sharing with you what we have been up to Insha'Allah.

Some crafts we have done really need to be prepared in advance of Ramadan starting, so I have decided to start the posts early so everyone can be prepared.  I really hope that you will be able to join in and make some of these crafts. If you do make some of the 30 day crafts that I will be posting about, I would love for you to send in some photographs and I will feature them in some posts here on my blog and on my Facebook Page Insha'Allah.

Below are a few teaser photographs that I have been taking while my children were doing the crafts. I was posting a few of them on my personal Facebook Page for my friends to see - so ignore any dates that are on the photographs, they are not relevant to this post!


Monday 24 June 2013

Full Covering Swimming Costume - Mini Tutorial


full covering swimming costume burkini muslim tutorial


I made a Full Covering Swimming Costume for my daughter and one for me too! I originally thought about buying one but when I saw the prices I thought they were sooooo expensive and even then you are not guaranteed to get the exact size you want! So after Googling what fabrics would be required I searched for the best deal which happened to be on Ebay. I Googled Burkini and full covering swimming costumes to get some ideas of designs to inspire me!

The swimming costume was actually quite easy to make. I used one of my daughter's top's and a pair of her trousers to trace around for a pattern. These costumes are great for Muslim Women or women who just want something more modest. You can adapt this costume tutorial to suit your own style.

Requirements:
  • Swimming Costume Fabric (there are a variety of mixes from Spandex/Nylon/Lycra/Polyester) I used 2 different colours of fabric.
  • Sewing Machine and thread.
  • Buttons and Elastic

full covering swimming costume burkini muslim tutorial

My Instructions:

To make the Tunic

I used a current long top of my daughter's and placed it on the fabric and traced around it (I didn't include the arms as I was using contrasting fabric for them.) - leaving extra space for sewing hems and also adding a high neck! I then cut out 2 pieces exact same size for the front and the back.

I personally wanted to add a design so added a long rectangle piece of contrasting fabric diagonally across the tunic. I simply cut the main parts of the tunic where I wanted the diagonal piece to go so that each tunic part was now cut into 2.

I then used the sleeves from my daughter's original top and placed them onto the contrasting fabric to make a pattern for the sleeves. I then cut out 2 pieces for the sleeves exact same size leaving a little extra for the hem. I actually used contrasting fabric to make some cuffs for decoration.

Once I had all the pieces I then sewed them all together. I started by sewing the cuffs to the sleeves and then the sides of the sleeves up first. Then I attached the diagonal piece of fabric to the tunic. Then I sewed the top part of the tunic at the neck to the top of the armhole and then from the bottom of the armhole to the bottom of the tunic. I then attached the arms to the tunic. I then made sure you I had stitched all seams securely, going over a few of them to strengthen them.

To make the Trousers

I again used a pair of my daughter's trousers and used them as a template to make a pattern for the swimming trousers. I then decided to add contrasting hems to the trousers too so sewed these to the bottom.  I then sewed the trouser legs together to make a pair of trousers. I added a high hem at the top to make a waistband to add some elastic to make them fit more securely. 

To make the head Piece

I then added a head piece, sorry not many photos! I cut out a rectangle piece of fabric and made a wide headband shape. I then cut out a circle shape of contrasting fabric and sewed this to the headband making a hat! I measured our head size to get the size I wanted for this piece. I then attached the hat to the top of the high neck of the swimming tunic at the back and coming around to the front, making sure that I ended the stitches so that it covers the ears. You can hem the part of the neck showing at the front, but I didn't as this fabric doesn't fray!

Extra Sewing

I then added buttons to the trousers on either side of the hip (below the waist). I then added to the tunic some wide elastic ( the ones you find inside trousers with buttons to extend the waist!) I had a lot of this in my stash as I always remove pieces from old clothing that have some use like buttons/zips etc. This enables the tunic and the trousers to attach so not to separate when swimming!


I made myself a swimming costume after this one but didn't bother adding contrasting cuffs and kept design simple which meant it was a lot easier and quicker to make. It is a personal choice as to how you want to change the design. I made the trousers quite baggy but some people like them a bit tighter which is easy to alter!

Here are some great You Tube tutorials I have found online to help with the sewing:

A YouTube Video on how to make Leggings (without the elastic waist - but that is not too difficult!) http://www.youtube.com/watch?v=PvILgAiJzR4

A YouTube Video on how to make a tank top. This shows you how to make a paper pattern if you wish and how to sew the front and top tunic together! http://www.youtube.com/watch?NR=1&v=NMQKWpSLtZI&feature=fvwp

A YouTube video on how to add sleeves: http://www.youtube.com/watch?v=-HIqxLokrkI

An Elastic Waistband Tutorial I found: http://www.youtube.com/watch?v=6FqtMjJBXXY

These are just a few videos, but there are many videos online showing you how to do specific sewing tasks that you may find more useful.
  

Monday 17 June 2013

Homeschooling - My New Journey

I am about to start a new chapter in my life - Homeschooling!  I already believe I am a part-time homeschooler as I already monitor my children's education and help them along the way with subjects they don't do at school or subjects they need a little extra with and of course great arty projects together! We will be starting once they have finished their current school term which isn't far away!

I bought some cupboards from the thrift store/ charity shop a few weeks back that I thought would be great to store all the homeschooling books. This is placed in the girls' bedroom.  The cupboards were made from different shades of wood but with a bit of sticky backed plastic the cupboards work really well together now!

I also used the same sticky backed plastic for other parts of their bedroom so that the cupboards blend in well with the rest of the room. It is hard to tell from the photo but the noticeboard hanging on the right also has the same sticky backed plastic placed onto the pinboard part.

The walls of their bedroom were all plain and I didn't want the cupboards to spoil the feel of the bedroom so we used some wall stickers on the wall to brighten the room up a little.


Sharing with you some other thrifty items I have bought recently which will hopefully be used for our homeschooling adventure:

 
This is a double sided board. Wipeboard and Blackboard! 

This is a laptop cushion holder.
 
I will hopefully be sharing some new craft adventures in connection with our Homeschooling.


Monday 10 June 2013

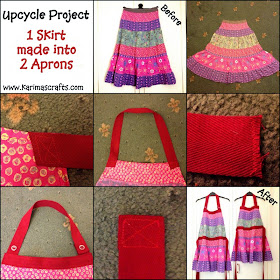
Matching Aprons Mini Tutorial

 
Here is the tutorial I promised for the aprons that I made for my giveaway a couple of months back.
Here is the link to the original giveaway post: giveaway-winner-apron-surprise
 
Requirements:
  • One long skirt
  • Apron string (or you could use some other fabric and make your own apron ties)
  • Buttons (optional to adjust neck string.)
 
Instructions: 
 
Step 1: I cut the skirt down the sides where the hem is, so that I have 2 pieces of skirt.
Step 2:  I trimmed the skirts to the size that I wanted. (I used an apron that I already had to get a good estimate of apron shape).
Step 3: I Hemmed all the sides to make them all neat and tidy.
Step 4: I cut and attached the apron strings to the neck of the apron. ( Again I copied the size of another apron.)
Step 5: I cut and attached the waist string to the apron. (I chose to attach all the way across the waist for decoration - you could just attach 2 pieces directly to the sides if you wish).
Step 6: I used zigzag stitch to keep the hems from fraying when I attached them to the apron. This is folded over so you don't see the edge.
Step 7: I added a couple of buttons to the neck string and sewed them through the folded neck string. This is because the neck string can fit differently on different people and this gives the option to make the neck string longer or shorter! I only did this for the adult one but you could do this for the child ones too!
Step 8: I folded the edge over and sewed a square and a sewed a cross through to secure the ends of the waist string to make them look neater.
Step 9: I repeated the same process for the other apron, I just adjusted the size to make it a smaller version to fit a child. You could keep the same dimensions to make another adult version!
  
This is such a great way to upcycle your old skirts!  Below is another link to a post where I made an apron from a dress: make-apron-from-dress-upcycling


You can even use shorter skirts and make a waist apron instead of a full length one! Below is a photo and a link to a waist apron I made a few years back:


Thursday 6 June 2013

The Hearts of Light - Guest Post


Today’s Guest Post is from the lovely lady who runs the website www.theheartsoflight.com   

They have a website where you can purchase some of their products or read some of their blog posts. They also have a Facebook Page too.
 
I was lucky enough to receive a copy of their Ramadan Planner for my eldest daughter, I was so excited by this because a few of my friends had used this ladies products and spoke highly of them.  My daughter loves her planner and she can’t wait to start using it. Below is some information provided to me to talk about this wonderful website.  

The Hearts Of Light Guest Post
 
Our children grow up today and their role models in life are pop stars and movie stars. Or even cartoon figures. Their houses and toys and gadgets are filled with these cartoon figures. They learn from very early on to get their inspiration from cartoon heroes. Well I wish that we can change that. I wish to provide our children with the material that will connect them with their true role models in life. I wish to be able to provide this material to homes and schools.

I hope we can help each other in raising our children in the best way possible and share our experiences and advice.

I hope that we can collectively work on helping each other providing parents with the tools and materials they need to be able to achieve their goals.
 
The products that we have been able to put up so far are:
Ramadan planner for ages 12+, Islamic baby record books, Aqeeqa invitations and some greeting cards.


Ramadan Planner (12+)
 

Ramadan Planner (12+) An Inside Page


Islamic Baby Record Book (Other Designs Available)


Aqeeqa Invitations
 
 
Greetings Card (other designs available)


Contacts:
www.theheartsoflight.com
https://www.facebook.com/TheHeartsOfLight


Monday 3 June 2013

Net Curtain design with Ribbon - Great Ideas


I added Matching Ribbon to the bottom of some Net Curtains. I have some peach coloured curtains in my bedroom and for privacy I also have a net curtain up at the window. I didn't want to buy anything to expensive but also felt the plain curtain was 'well too plain'.

I managed to find some ribbon which was very similar in colour to the curtains and bought 2 metres which was enough to cover the bottom edge.  The window now looks really nice with the matching net! A very simple and cheap solution to decorate the room!

There is no need for a tutorial on this as it is very straight forward. I simply ironed the ribbon to make a hem and placed the ribbon over the edge of the net curtain and straight stitched across with the sewing machine - very easy!