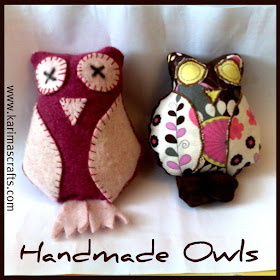
Hi, above are the owls that me and my daughter made today.
I found a great free pattern and tutorial the other day, that I knew would be perfect for the kids during the school holidays. I sat with my eldest daughter making these cute owls and also sat with my youngest who made an owl picture with the card and glue so that she didn't feel left out!
The owl in the pink fabric on the left was hand sewn by my 9 year old daughter. I machine stitched the brown owl on the right in the photograph. I must say though, that I much prefer the owl that my daughter made.
I found a pattern which I used to cut out the pieces for the owls, but I didn't personally follow the tutorial that came with it, but it looks like a really good tutorial with quite a few photographs helping with the steps. Here is the link
sewlittlefabric.blogspot.com owl softie
Because I was sitting with my daughter, it was easier for me to just make up the owl as we went along, rather than trying to follow a pattern, especially as I was also trying to amuse my 4 year old too. We actually made the eyes slightly smaller and we also decided to add claws to the owl. I used normal cotton fabrics, however my daughter chose to use felt fabric (which I felted from old wool jumpers). I had some spare stuffing already in the house, so basically I didn't need to buy anything for this project!
Steps for felt owl were:
- Cut out the template that was in the link I provided.
- Cut out the pieces of fabric required, making sure that you have a back piece too (not shown in my photograph).
- Pin the loose front pieces together (wings,beak and eyes).
- Blanket stitch around all the attached pieces.
- Place the front and back together (pattern facing each other)
- Stitch all the way around, leaving an opening at the very bottom.
- Turn the owl inside out, to the right way.
- Stuff the owl with suitable stuffing.
- Cut out some claws with spare felt.
- Place the claws in the opening, then hand stitch the opening closed, securing the claws at the same time.
My youngest really wanted to join in, but I am not yet comfortable with her trying to sew (she is only just 4). I used the same template and cut out the pieces in some coloured card. She then glued these together and decorated this and made a lovely picture.
See photograph below of my youngest with her artwork.
My eldest daughter then decided that the owls needed to be outside in the trees, so we took a few photographs of the owls outside in the fresh air! Here is one of the photographs below:
The kids really enjoyed making the owls today, and it was even better as it didn't cost me anything. I used felt from upcycled jumpers for my daughter's owl and remnants of cotton fabric from past sewing projects for my owl. This project was completed in less than 2 hours, if I had made the felt owl myself I would guess that it could probably be done in less than 1 hour.
Linking this post to:


